To understand what I am doing, you have to know some basics of lathes. I'll refer you to Tubalcain, a well regarded instructor. Listen carefully for 'quick change gear box' and 'lead screw.'
One of the neatest capabilities of a lathe is the ability to cut screw threads. Here's a link to a classic video showing this in action:
Cutting threads
(In that video, the camera is mounted to the carriage. It looks like the work is moving. It isn't. The carriage is moving.)
We saw how the lathe cut a screw thread. But that didn't happen by itself. What made the cutter find just the right spot to begin? Why did it cut that rather coarse thread instead of a fine thread? Why did it cut a thread at all, and not produce a cylinder?
The reason is that the operator configured the lathe so the spindle was connected to the lead screw using a carefully selected gear train. The gear train controlled the ratio of spindle turns to lead screw turns, and by extension the the ratio of spindle revolutions to carriage movement. If the spindle makes 20 revolutions and the carriage moves 1", a 20 TPI thread will be produced.
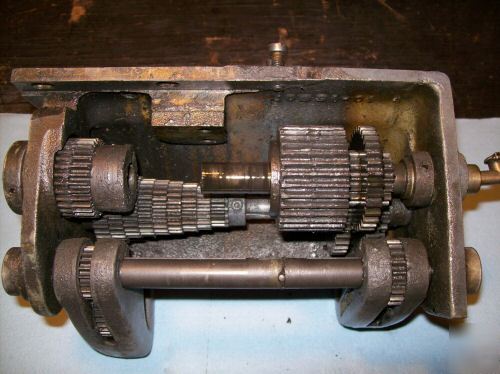
In the old days, the ratio between the spindle and lead screw was set by elaborate combinations of individual change gears. In this picture, the four gears at the bottom (look sharp to see the 4th!) are the change gears. Those gears were selected from a stack of gears, according to a chart, in order to produce the desired ratio.

So, it takes time to get those gears set up. Every time you want to move the carriage at a different rate, you need a different change gear setup.
Enter the QCGB
Someone enterprising person realized that if the gears could be engaged as needed, machinists would save a lot of time and thus be more profitable. The result was the quick change gear box. While there are many designs and these have evolved over the last century, this QCGB from the Atlas company is representative:
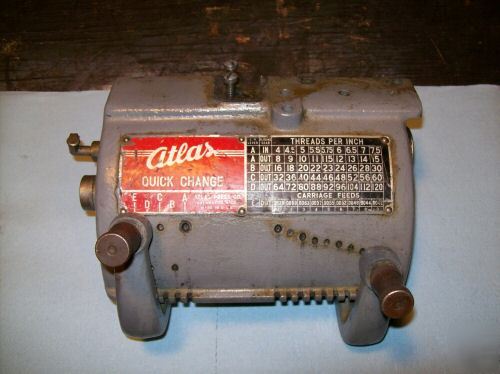
It's simple to use. We see two levers and a chart. If you want to cut a certain thread, first find the TPI in the chart. Note the letter on the left edge of the chart. The left lever is set to the position corresponding to this letter. Then the right lever is aligned with the column including the desired TPI. That's it. For example, if you wanted to cut a 20 TPI thread, you'd set the left lever to the B position and set the right lever directly under the 3rd column.
Inside, the QCGB isn't so simple. We see the 'cone' of gears that allows subtle changes to the ratios - 8 to 10 to 12 etc. On the right we see the gears which divide the spindle revolutions by two. Each time the move the left lever, this side of the gearbox divides by 2, 4, or 8, etc.. If you look at the chart, you'll notice that the as you move down the chart, the numbers double.
The bad news is that I don't have a QCGB. If I bought one, it would be quite a project to connect it to my lathe; my lathe was never made to have a QCGB.
What's a computer geek to do!
Perhaps I could just build the QCGB? Nope - while it would be rewarding, the cost would be prohibitive. There are probably 25 gears in there and they are very expensive. Then there's everything else you see. It adds up fast.
Perhaps I could 'CNC' the lathe - that is, control the carriage movement using a computer. This requires a computer running dedicated machine control software to be connected to a motor that drives the lead screw. There's a popular project on the internet called "electronic lead screw" that takes this approach. I find it unconvincing. Furthermore, I work with computers every day - I don't want one in the shop. That's why I have a shop - to get away from computers!
My next idea was to build an electronically assisted QCGB. Think cut-down CNC with a dedicated computer, tucked out of site. But this is a lot like the Electronic Lead Screw project and is ultimately just an example of Not Invented Here. Further, I've heard too many debates about processor speed, issues with non-related jobs running on the computer that induced lag (terrible) and so forth.
I decided to pare the design down to the bare minimum - an electronic device using typical 40xx chips - no programming, no processor, no operating system. And, as an added benefit, raw speed.
As I was researching the chips I'd need, however, I discovered something remarkable; an IC called a CPLD - Complex Programmable Logic Device. In this simplest terms, this is a chip with a large number of gates that can be connected together pretty much arbitrarily. Once connected, it's as if they'd been soldered together by hand. These amazing devices can allow arbitrary designs tying together hundreds of gates. Best of all, the CPLD can be reprogrammed, thousands of times, using a USB cable and free software. As if that wasn't enough, a small CPLD can be purchased for a princely $1.25. The next size up, the one I need, costs $2.50. I think I can handle it.
Ladies and gentlemen, we have a winner.
To learn about this technology, I purchased a development kit from Digilent that included the following board:

This board includes a pretty thumping CPLD (the Xilinx Coolrunner-II with 256 macrocells), 2 buttons, 2 slide switches, 4 LEDs, and a 4-digit 7-segment LED unit. All you need to experiment and learn. The dev kit comes with a USB cable for programming the CPLD and free development software. So far, it's a 10/10.
Now my goal became clear - implement a full-featured QCGB using a CPLD.
(end of part 1)
In part 2, I'll talk more about the CPLD and what I'm doing with it.
This blog share best information. I like this blog.
ReplyDeleteGear Box | Agriculture spare parts